
Chrome Squid3 Proxy Settings
Set up HTTP proxy on Google Chrome Browser
1. Click on the Chrome Menu, which is in the top-right corner of the browser window and then press Settings.

2. When Settings open, scroll down to find Show advanced settings. Click on it.

3. Then scroll down to find Network section. Click on Change proxy settings button.

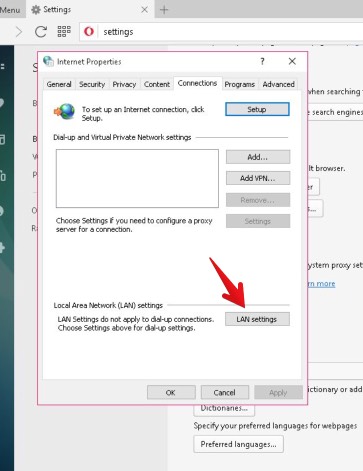
4. A new window pops up. Press LAN settings.

5. On another new window check the box Use a proxy server for your LAN (These settings will not apply to dial-up or VPN connections).

6. Enter the our VPN network address you want to connect in to the Address field. (Click to find our VPN Server List)
7. In the field Port enter 3128 and press OK. Note: If you want to ensure a full privacy you should NOT check the box Bypass proxy server for local addresses.
8. Press OK also on the previous window.
9. When you will try to access a site you will be prompted for the username and password. Enter your Username and Password and press Log in.
10. Your Chrome configuration is completed.
In order to check whether it really works, go to What is my IP address website. There you will see the IP address of your chosen server.

Firefox Squid3 Proxy Settings
Set up HTTP proxy to work with Mozilla Firefox Browser.
1. Open Firefox Mozilla
2. Click on the Firefox Menu, which is in the top-right corner of the browser window and then press Options.

3. Options window opens. Click on Advanced. It can be found at the bottom of the Menu list.

4. Choose Network tab and click on the button Settings.

5. A new window pops up. Choose the following Manual proxy configuration.

6. In the HTTP proxy field enter one of VPN servers addresses.(Click to find our VPN Server List) Also, check the box Use this proxy server for all protocols.
For Port enter 3128.
It is optional to choose the box Do not prompt for authentication if password is saved. If you choose it, then once you save credentials for proxies, the authentication will not prompt again, unless it fails.
Click on OK.
7. When you will try to access a site you will be prompted for the username and password. Enter your Username and Password and press OK.

8. Your Mozilla Firefox configuration is done.
If you want to check whether HTTP proxy really works, go to What is my IP address website. There you will see the IP address of your chosen server.

Safari Squid3 Proxy Settings
How to set up HTTP proxy on Safari Browser
1. Open Safari Menu and click on Preferences.

2. A new window pops up. Go to the Advanced tab and next to the Proxies you will see a button Change Settings. Click on it.

3. In another new window you have to choose the protocol to configure. Check the box Web Proxy (HTTP).
In the Web Proxy Server field enter one of VPN’s servers addresses. (Click to find our VPN Server List) .Next to it enter the Port, which is 3128.
Same setting apply to Secure Web proxy (HTTPS).
4. Check the box Proxy server requires password and enter your Username and Password in the authentication fields.
Same setting apply to Secure Web proxy (HTTPS).
Press OK.


5. You might be prompted for the username and password once more when you will try to access a site. In this case, enter your Username and Password and click on OK.

6. Safari configuration is completed and from now on you can browse anonymously.
In order to check whether it really works, go to What is my IP address website. There you will see the IP address of your chosen server.

Opera Squid3 Proxy Settings
How to set up HTTP proxy on Opera Browser
1. Click on the Opera Menu, which is in the top-left corner of the browser window and then press Settings.

2. When Settings open, scroll down to find Network section. Click on the button Change proxy settings.

3. A new window pops up. Choose Connections tab and click on LAN settings.
4. On another new window check the following box Use a proxy server for your LAN (These settings will not apply to dial-up or VPN connections).
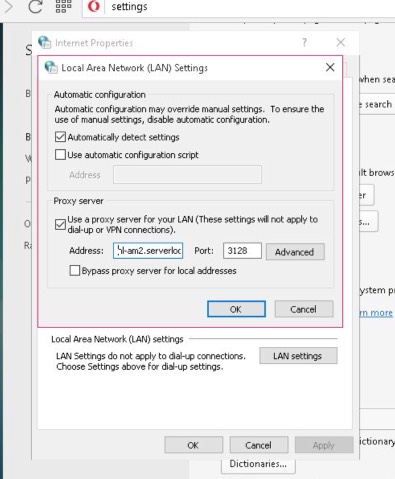
5. For Address enter one of VPN’s servers addresses. (Click here to find our VPN Server List)
6. For Port enter 3128. Note: To ensure a full privacy do NOT check the box Bypass proxy server for local addresses.
Press OK.
7. Click on OK on the previous window as well.
8. Once you try to access a site you will be prompted for the username and password. Enter your Username and Password and press Sign in.

9. The configuration is completed.
If you want to check whether it really works, go to What is my IP address website, where you will see the IP address of your chosen server.

VPN setup for torrenting
Full VPN: Introduction
Getflix Full VPN (Virtual Private Network) provides secure and private Internet access to all its users.
Our Full VPN is a free, optional service for all paid Getflix subscribers.
Download Getflix VPN Applications Here
What’s Getflix Full VPN and What are the benefits?
Benefits of Getflix Full VPN
- All your Internet traffic gets encrypted through our global network
- Total freedom of internet browsing without leaving any footprints
- Hides your IP address
- Protects your data from hackers, governments, ISPs, and other prying eyes
- Secure your computer on hotspot WiFi connections
- You can also access streaming services from remote country locations
- There are NO LOGS kept in the network
- All VPN connections come with UNLIMITED SPEED and BANDWIDTH
The best part is Getflix Full VPN supports any PC/Mac and Mobile Devices operating systems. Also, you can access VPN from any Internet connection; DSL, Cable, Satellite, 3G/4G, etc.
For more information, see our Full VPN FAQs.
Supported VPN Protocols
Getflix Full VPN provides four different layers of VPN security protocols:
- PPTP Protocol
PPTP provides 128-bit encryption. It’s supported by almost every operating system on PCs and mobile devices. Simple to set up. Usually, provides very fast speed. But some Internet Service Providers are throttling this protocol which may give you very slow speeds and disconnections. In such case, we suggest testing L2TP, SSTP or OpenVPN protocols. - L2TP Protocol – Suggested for Windows, Mac, Linux
L2TP provides 256-bit encryption. It’s more secure than PPTP and also supported by almost every operating system on PCs and mobile devices. Simple to set up. L2TP Provides breakneck speed. - SSTP Protocol – Suggested for Windows
SSTP provides 2048 bit encryption. It’s very secure but can only be used on Windows operating systems. Simple to set up. Slower than PPTP and L2TP. - OpenVPN UDP Protocol – Suggested for Windows, Mac, Linux
OpenVPN provides 2048 bit encryption. It’s also very secure and supported by almost every operating system on PCs and mobile devices. It’s complicated to set up. OpenVPN provides the fastest speed.
Which protocol should I use?
We usually suggest our users use OpenVPN UDP Protocol mainly as it provides the best encryption with the best possible speed on most networks. Depending on your ISP performance you may try others of L2TP and SSTP (Windows Only) protocols for the best encryption, security, and speed. Some ISPs may be throttling PPTP and L2TP protocol which can lead slower than expected speeds or disconnections. In such case we suggest you use SSTP or OpenVPN UDP.
Setup Instructions
Click on the device below for instructions on how to set up Getflix Full VPN (Virtual Private Network).


A list of server locations and addresses can be found here.
Full VPN: Server Locations and Addresses
Getflix VPN App for Windows
Our Getflix VPN network allows you to encrypt all your internet traffic and become secure from prying eyes like governments, internet service providers, or hackers. All our Getflix VPN network locations have SmartVPN capability and provide you access to 500+ of streaming services from any location. Therefore, you can connect to the physically closest network to your location and experience the best possible encrypted VPN speeds while streaming your favorite channels, all at the same time.
All our networks are on 10GE port speeds.
You can download the Getflix VPN App for Windows here: https://1617945596.rsc.cdn77.org/windows/GetflixVPNClient.msi
![]()
In order to use our VPN network, you need to TURN ON and activate your FULL VPN in your Getflix Dashboard / VPN section here: https://www.getflix.com.au/manage/vpn
You will find your VPN username and password on this page!
We will also keep updating this new app every month for any bugs or issues that might occur. If you experience any issues or need any further functions, please open a ticket with our team, and our VPN engineers will add these features in the future.
We appreciate your patience while we keep improving it.
Features of our Getflix VPN App for Windows
SmartVPN
Our SmartVPN network locations are all optimized for the best streaming experience while they encrypt your internet traffic. You can physically connect the closest server to your location and access most of our SmartDNS streaming channels. You don’t need to activate your IP address in your Getflix account when you connect to our SmartVPN network.
Torrent
Our Torrent allowed network servers are safe to run Torrent/P2P applications. So you are safe from your ISP notifications when you are torrenting.
Auto Start
This option runs our Getflix VPN application automatically when your Windows starts.
Auto Reconnect
This option automatically connects to the last connected server location when your app starts. Also, when your VPN connection gets disconnected for any reason, our VPN app will automatically reconnect.
Kill Switch (Beta)
Kill switch automatically monitors your network traffic, and if the app notices any VPN disconnections for any reason, it kills all your windows internet traffic. So no traffic goes directly through your local ISP to keep you safe. You need to reconnect to our VPN network to get access to the internet. Remember to turn off this function and save settings if you don’t want the kill switch running.
Prevent DNS Leak (Beta)
This option runs in the background, and if your computer tries to reach your local ISP DNS, it blocks it and redirects DNS traffic to the VPN server DNS for your security. So your ISP can not see which domains you are querying.
Full VPN Setup For Windows 10: OpenVPN
You can download the Getflix VPN App for Windows here:
https://1617945596.rsc.cdn77.org/windows/GetflixVPNClient.msi
![]()
If you prefer to setup OpenVPN manually you may use the following instructions
Full VPN Setup For Windows 10: OpenVPN


here (versions 2.6 and above)


OpenVPN Setup Instructions for Getflix FullVPN Service
Download OpenVPN Configuration Files
1. Click Here to download Config Files for older versions on your computer.
Click Here to download Config Files for versions 2.6 and above on your computer.
2. Extract the file you downloaded. File name should be like Getflix-OpenVPN.zip.
3. Copy the config files of the network locations you want to use, to your Android device.
Install OpenVPN Connect Application from Android Store
1. Install “OpenVPN connect” app from the android store.
2. Choose from menu “Import”, then “Import Profile from SD card”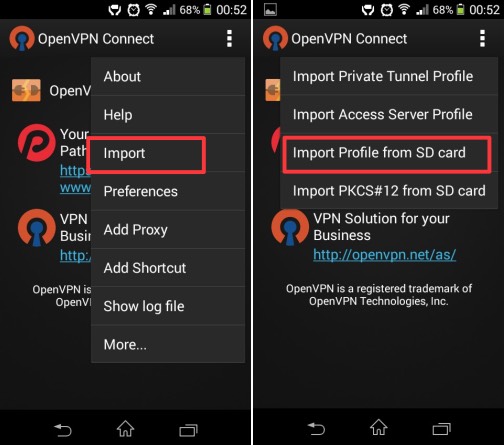
3. Select *.ovpn profile:
4. Choose “Continue” . Now you are connected.
Getflix VPN App for Android
Full VPN Setup For MAC OS: OpenVPN
Below, you will find MAC OS OpenVPN setup instructions for #Getflix #FullVPN network.
OpenVPN Setup Instructions for MAC OX – Getflix FullVPN
Ubuntu Network-Manager OpenVPN Setup Guide for Getflix FullVPN
STEP #1
Download Tunnelblick from: http://code.google.com/p/tunnelblick/wiki/DownloadsEntry?tm=2
STEP #2
Install Tunnelblick by following the on-screen instructions:

STEP #3
Launch Tunnelblick
STEP #4
When the installation is finished, Click Quit.
STEP #5
Now Click Here to Download Config Files for older versions for Getflix FullVPN Network or
Click Here to Download Config Files for versions 2.6 and above for Getflix FullVPN Network.
STEP #6
Extract the file you downloaded. File name should be like Getflix-OpenVPN.zip.
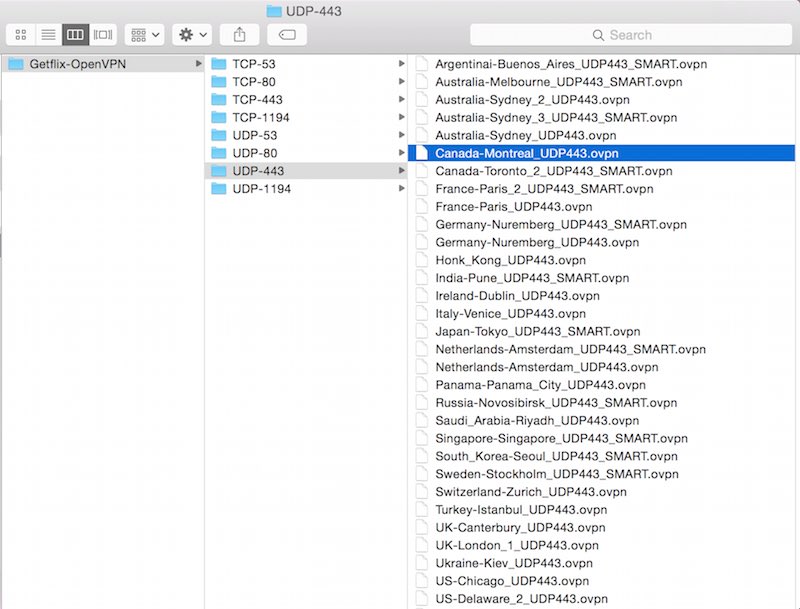
Click the desired port-protocol directory. If that protocol port is blocked on your network, you can always choose another one and try again. We suggest using OpenVPN UDP ports first for connecting to servers.
Now, Select the Country/City of the OpenVPN Server Network you would like to get connected to and double-click it.
Config file will start the Tunnelblick application. Accept to open the Tunnelblick.
When you are prompted to install configuration for all users? Click All Users.
Your Mac might ask you the mac login password to allow installation depending of your mac security preference.
You might be prompted to check your IP after VPN connection. You can click Check for a change or Do not check for a change depending on your preference.

STEP #7
Once the Tunnelblick configuration is applied, you can click on the Tunnelblick icon on your top right side of the taskbar. Click on Tunnelblick and Select the VPN Network you would like to get connected to.
You will be prompted to enter your VPN account Username and Password. If you don’t remember your VPN account credentials, navigate to the Your Getflix Management Console FullVPN section. Make sure to ENABLE your FullVPN below the page.
Enter your VPN account username and password. Make sure to select “Save in Keychain” so you won’t need to enter this information again in the future.
You are now connected and all your internet traffic is Encrypted & Secured!
How to add more locations to Tunnelblick?
You can add more locations to Tunnelblick screen so that you can choose anyone to connect anytime. In order to do this:
1. Close Tunnelblick
2. Open your Getflix OpenVPN Config File folder.
3. Select the Getflix OpenVPN location you like to add to tunnelblick and double-click it.
Tunnelblick will load and add the new config as well.
If you are experiencing any trouble with the setup and need assistance, please contact our 24/7 support team here: https://www.getflix.com.au/support
Getflix VPN App for iOS
Full VPN Setup For iOS: OpenVPN Protocol
This article explains how to set up OpenVPN protocol connection on Apple iOS Devices.
Before we begin, you need to Activate your VPN account from your Getflix > Manage > VPN panel. In order to do this, log into your https://www.getflix.com.au/manage/vpn.
Setting up your iOS Device (iPad, iPhone, iPod) for OpenVPN Protocol:
1. Install “OpenVPN connect” app from App Store.
2. Click Here to download Config Files for older versions or
Click Here to download Config Files for versions 2.6 and above
on your iOS device and extract the file you downloaded. (e.g. use iZip app for this task)
3. Select “.ovpn profile and open it in “OpenVPN Connect”.
4. In “OpenVPN Connect” click “+” button.
5. Type your username and password. Then connect to server.
6. Check you public IP address on www.whatismyipaddress.com
Full VPN Setup For iOS: OpenVPN Protocol
DNS-over-VPN: Introduction
System requirements for VPN app
DNS-over-VPN: Android Devices
This article will explain how to set up our DNS-over-VPN feature on an Android device.
Important note: This method has become obsolete and may not be fully secure so it may not work in all cases. We’re looking for a new solution based on more secure protocols. Once found, it will be put on our website.
Note: Different versions of Android devices have different steps, try to find fields mentioned in these instructions even if you don’t see the exact names described here.
Before you begin, use the web browser on your Android device to log into your Getflix account and ensure your IP address is registered (and that the IP address status check passes). You will only be able to connect to our VPN servers if your IP address is registered.
Note: If you are using a 3G/4G connection to access Getflix, your IP address may change frequently. You will need to access the Getflix website from your Android device each time before connecting to the VPN.
Step 1
Go to Wireless and network settings page and tap the More… item.

Step 2
Tap on VPN then tap Add VPN Network or the + button.

Step 3
Using a web browser, navigate to the ” Setup” section on the Getflix website. Locate your closest “VPN Enabled” DNS server.
- Set the Name to something like “Getflix DNS VPN”.
- Set the Type to “PPTP”.
- In the Server address box, enter the address of your closest “VPN Enabled” DNS server.
- In the Forwarding routes box, enter 10.233.99.1/32 – optionally, you can also enter 8.8.8.8/32 8.8.4.4/32 (put a space between each entry).
Tap on “Save” to continue.

Step 4
Using a web browser, navigate to the ” VPN” section in your Getflix account. Then, using the details on that page, fill out the form as follows:
- In the Username box, enter the value displayed next to “VPN Username”.
- In the Password box, enter the value displayed next to “VPN Password”.
- Check Save account information.
Go ahead and connect to the VPN.

Step 5
You can disconnect and connect to the VPN at any time from this screen.

Troubleshooting
There are several reasons that the VPN connection will fail. Here are some things to check.
- Ensure that your IP address is registered on the Getflix website.
- Ensure that no other device is connected to our VPN using your account, only 1 concurrent VPN connection per account is permitted.
If the VPN connection still fails, please log a ticket with our support team for assistance.
DNS-over-VPN: Apple iPhone
This article will explain how to setup our DNS-over-VPN feature on an Apple iPhone.
DNS-over-VPN using PPTP is not supported on the latest iOS 10 and later versions due to the removal of the PPTP protocol by Apple. We are testing the L2TP protocol on our Melbourne DNS server (118.127.62.178). You will need to use the Shared Secret 1234567890 if you want to try this out.
Before you begin, use the web browser on your iPhone to log into your Getflix account and ensure your IP address is registered (and that the IP address status check passes). You will only be able to connect to our VPN servers if your IP address is registered.
Note: If you are using a 3G/4G connection to access Getflix, your IP address may change frequently. You will need to access the Getflix website from your iPhone each time before connecting to the VPN.
Step 1
Tap on the Settings icon, go to the General section, then tap on the VPN item.

Step 2
Tap on the Add VPN Configuration link.

Step 3
Click on the PPTP tab at the top of the screen.
Using a web browser, navigate to the ” Setup” section on the Getflix website. Locate your closest “VPN Enabled” DNS server.
- In the Server box, enter the address of your closest “VPN Enabled” DNS server.
- Set the Description to something like “Getflix DNS VPN”.
Using a web browser, navigate to the ” VPN” section in your Getflix account. Then, using the details on that page, fill out the form as follows:
- In the Account box, enter the value displayed next to “VPN Username”.
- In the Password box, enter the value displayed next to “VPN Password”.
- Turn the Send All Traffic option OFF.
- Make sure the Proxy option is OFF.
Tap on “Save” to continue.

Step 4
Slide the switch ON to connect to the VPN. A small “VPN” icon should appear in the status bar at the top of the screen.
If you login to your Getflix account now, the DNS test should pass and services should be unblocked on this iPhone.
If the VPN connection fails, see the troubleshooting tips below.

Step 5
Once you’re done, slide the switch OFF to turn off the VPN.
You can connect and disconnect at anytime using the VPN switch at the top of the Settings menu.

Troubleshooting
There are several reasons that the VPN connection will fail. Here are some things to check.
- Ensure that your IP address is registered on the Getflix website.
- Ensure that no other device is connected to our VPN using your account, only 1 concurrent VPN connection per account is permitted.
If the VPN connection still fails, please log a ticket with our support team for assistance.
DNS-over-VPN Setup: Mac (OS X)
This article will explain how to set up our DNS-over-VPN feature on a Mac (OS X).
DNS-over-VPN using PPTP is not supported on the latest macOS Sierra (10.12) and later versions due to the removal of the PPTP protocol by Apple. We are testing the L2TP protocol on our Melbourne DNS server (118.127.62.178). You will need to use the Shared Secret 1234567890 if you want to try this out.
Before you begin, use a web browser to log into your Getflix account and ensure your IP address is registered (and that the IP address status check passes). You will only be able to connect to our VPN servers if your IP address is registered.
Step 1
Open “System Preferences” and click on the “Network” icon.

Step 2
Click on the “+” button to add a new network.

Step 3
Fill out the form as follows:
- For the Interface option, select “VPN”.
- For the VPN Type option, select “PPTP”.
- In the Service Name box, enter “Getflix DNS VPN”.
Click the “Create” button

Step 4
Using a web browser, navigate to the “Setup” section on the Getflix website. Locate your closest “VPN Enabled” DNS server.
- In the Internet address box, enter the address of your closest “VPN Enabled” DNS server.
Using a web browser, navigate to the “VPN” section in your Getflix account. Then, using the details on that page, fill out the form as follows:
- In the Account Name box, enter the value displayed next to “VPN Username”.
- Make sure Encryption is set to “Automatic (128 or 40 bit)”.
Click on the “Authentication Settings” button.

Make sure “Password” is selected and enter the value displayed next to “VPN Password”, then click “OK”.

Step 5
Click on the “Advanced” button. On the screen that appears, ensure the “Send all traffic over VPN connection” option in NOT enabled.

Click the “DNS” tab and make sure both boxes are empty. Use the “-” button to delete any entries.

Step 6
Check the “Show VPN status in menu bar” option, then click the “Apply” button.

You can now click the “Connect” button and the VPN connection should be established. If you log into your Getflix account now, the DNS test should pass and services should be unblocked. Once you’re done, click “Disconnect” to turn off the VPN.
You can connect and disconnect at anytime using the options in the menu bar at the top of the screen. If the VPN connection fails, see the troubleshooting tips below.
Troubleshooting
There are several reasons that the VPN connection will fail. Here are some things to check.
- Ensure that your IP address is registered on the Getflix website.
- Ensure that no other device is connected to our VPN using your account, only 1 concurrent VPN connection per account is permitted.
If the VPN connection still fails, please log a ticket with our support team for assistance.
DNS-over-VPN Setup: Windows 8
DNS-over-VPN Setup: Windows 7
This article will explain how to set up our DNS-over-VPN feature on a PC (running Windows 7).
Before you begin, use a web browser to login to your Getflix account and ensure your IP address is registered (and that the IP address status check passes). You will only be able to connect to our VPN servers if your IP address is registered.
Step 1
Click on the Windows Start button and type “network” in the search box. When the results appear, click on the “Network and Sharing Center” link.

Step 2
Click on the “Set up a new connection or network” link.

Step 3
Select the “Connect to a workplace” option, then click “Next”.

Step 4
Select the “No, create a new connection” option, then click “Next”.

Step 5
Click the “Use my Internet connection (VPN)” option.

Step 6
Using a web browser, navigate to the ” Setup” section on the Getflix website. Locate your closest “VPN Enabled” DNS server.
- In the Internet address box, enter the address of your closest “VPN Enabled” DNS server.
- In the Destination Name box, enter “Getflix DNS VPN”.
- Select the “Don’t connect now; just set it up so I can connect later” option.
Click “Next” to continue.

Step 7
Using a web browser, navigate to the ” VPN” section in your Getflix account. Then using the details on that page, fill out the form as follows:
- In the User name box, enter the value displayed next to “VPN Username”.
- In the Password box, enter the value displayed next to “VPN Password”.
- Select the “Remember this password” option.
Click on the “Create” button.

Step 8
Don’t click “Connect now”, click the “Close” button instead.

Step 9
Go back to the “Network and Sharing Center” screen and select the “Connect to a network” option.

Step 10
In the bottom corner of your screen, click on “Connect” next to the “Getflix DNS VPN” item.

Step 11
Click on the “Properties” button.

Step 12
On the Options tab, make sure the “Include Windows logon domain” option IS NOT selected.

Step 13
On the Security tab, change the Type of VPN option to “Point to Point Tunneling Protocol (PPTP)”.
Make sure the “Challenge Handshake Authentication Protocol (CHAP)” option and the “Microsoft CHAP Version 2 (MS-CHAP v2)” option are both selected and the the other 2 options are not selected.

Step 14
On the Networking tab, ensure ONLY the “Internet Protocol Version 4 (TCP/IPv4)” item is enabled (be sure to un-tick the others), then select this item and click the “Properties” button.

Step 15
On the “IP Settings” tab, make sure the “Use default gateway on remote network” option IS NOT selected.

Step 16
On the WINS tab, select the “Disable NetBIOS over TCP/IP” option.
Click the “OK” button to close this window, then click the “OK” button to close the 1st properties window.

Step 17
You can now click the “Connect” button and the VPN connection should be established.
If you login to your Getflix account now, the DNS test should pass and services should be unblocked.

Once you’re done, click “Disconnect” to turn off the VPN.
You can connect and disconnect at anytime using the network menu in the system tray. If the VPN connection fails, see the troubleshooting tips below.

Troubleshooting
There are several reasons that the VPN connection will fail. Here are some things to check.
- Ensure that your IP address is registered on the Getflix website.
- Ensure that no other device is connected to our VPN using your account, only 1 concurrent VPN connection per account is permitted.
If the VPN connection still fails, please log a ticket with our support team for assistance.